Flash Screenly onto NEC monitors with the Raspberry Pi Compute Module
Learn how to set up Screenly on NEC monitors with the Raspberry Pi Compute
by dmountcastle
NEC provides beautiful, commercial grade digital sign displays, many of which integrate directly with a custom Raspberry Pi Compute Module. In this article, we list the necessary steps for setting up your NEC display and integrated Raspberry Pi Compute Module to run Screenly.
Before we get started, you will need a few things:
- An NEC monitor with the Raspberry Pi Compute Module add-on.
- The NEC remote control (it is possible to do with the buttons on the monitor, but we do not recommend this as it is very tedious).
- An "A-Male to B-Male" USB cable. This should come in the box with your NEC monitor. If you do not have one, you can find one on Amazon for $5.
- A computer (macOS, Linux or Windows) with Etcher installed
- You could use other software too, but Etcher simplifies the process a fair bit
- The Screenly disk image for CM3. You download this disk image from within your account using the web interface. Simply navigate to Screen then Add Screen to find this disk image. The one you need is called “CM3,” which stands for Compute Module 3.
Once you have the above things ready we can get started.
Connecting the hardware
- Make sure your Raspberry Pi is physically installed along with the NEC Compute Module Interface into the display. If you are yet to do this, you can find detailed instructions in the NEC Raspberry Pi Compute Module Setup Guide.
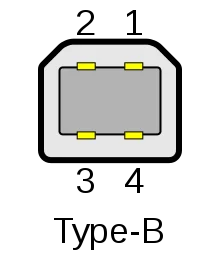
- Next, you will need to connect your computer to the NEC display via USB in order to properly program the Raspberry Pi. Make sure to connect the host PC to the correct port on the monitor. It should be the USB type B connector (see Fig 1) located on the right side of the monitor. There is only one USB type B port on the monitor, so you should not be able to put it in the wrong port. Please note that you should connect your the USB cable directly into your computer, and not use a USB hub or extender as that can cause issue.
Prepare the monitor
Before we get started, we first need to connect the monitor to both power as well as Ethernet (required for Screenly). Once you have done this, the next step is to set the Raspberry Pi Compute Module in USB Boot Mode to allow us to write to it. To do that, follow these steps:
- Press the Menu button on the remote control to bring up the On Screen Display (OSD) menu
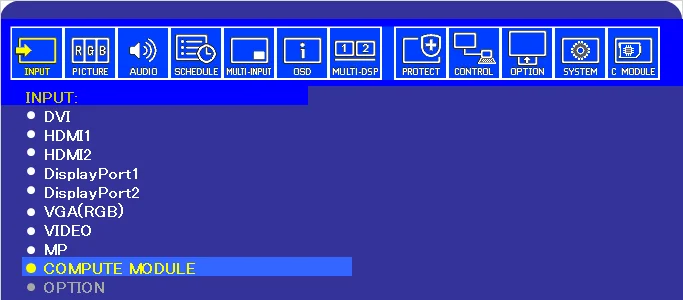
- Navigate to INPUT and select COMPUTE MODULE to bring up the Raspberry Pi as the active input source
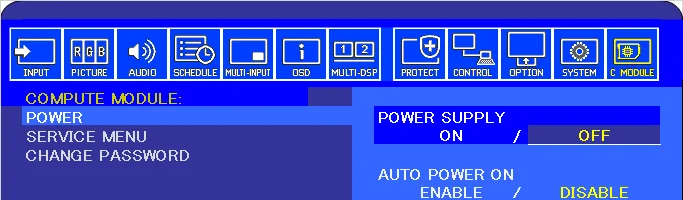
- Navigate to C MODULE
- Select POWER, then select POWER SUPPLY and set to OFF, and select AUTO POWER ON and set to DISABLE.
- Go back to the SERVICE MENU
- If the SETTING LOCK is ON, you need to first disable it to reach the USB BOOT MODE. The default code is 0 0 0 0.
- Navigate down to USB BOOT MODE and set it to ENABLE
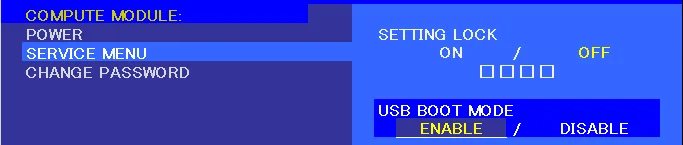
- Go back to POWER and set POWER SUPPLY to ON
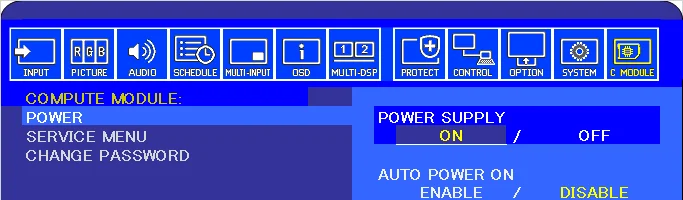
- Now leave this up on the screen while we prepare the PC.
Prepare the PC and start the flashing procedure
It is now time to prepare your computer for the flashing. It is assumed that you already have downloaded the disk image above, and have installed the latest version of Etcher. It is important to stress that you must use the latest version, as it will both speed up the flashing procedure, as well as remove the requirement to install "usbboot." Another benefit with using Etcher over other tools is that it verifies the result after the flashing to ensure that nothing went wrong in the process.
It is also worth noting that you should not extract the zip file that the Screenly disk image comes with. Etcher will take care of that automatically.
- Launch Etcher
- Select the Screenly disk image that you downloaded before
- Once the device has been initialized, you should see something similar to this:
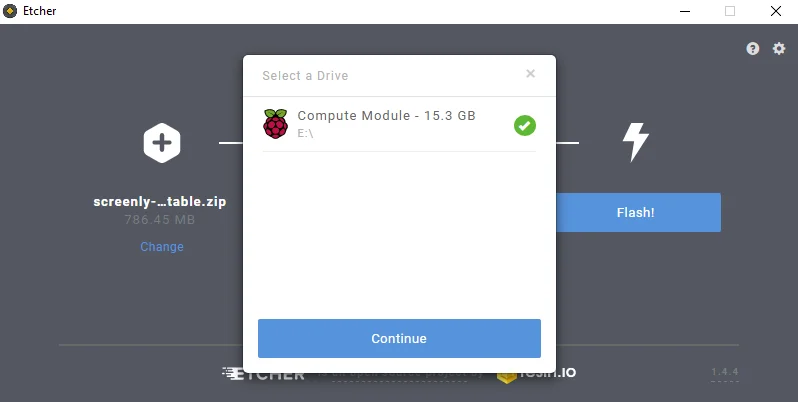
- Select the device, press Continue and finally "Flash!"
- Now sit back while you wait for the flashing to finish
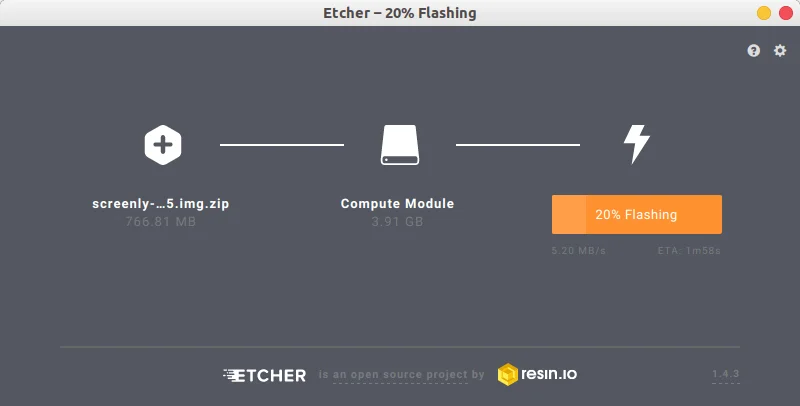
(The observant viewers will be quick to spot that the screenshots above uses a 4GB Compute Module rather than the 16GB from NEC, but the process is identical.)
Assuming you did not get any error reported from Etcher, you are can now proceed to the next step.
Restoring the Compute Module to normal configuration
The last step is to disable the USB Boot mode. Follow these simple steps:
- Press the Menu button on the remote control to bring up the On Screen Display (OSD) menu
- Navigate to C MODULE
- Select POWER and select OFF
- Go back to the SERVICE MENU
- Navigate down to USB BOOT MODE and set it to DISABLE
- Go back to POWER and set POWER SUPPLY to ON
- The Raspberry Pi should now again spring to life and within a few seconds you should see the Screenly logo on the screen.
Note: In some instances, you may find that the USB Boot Mode is already disabled, and the power supply is already set to On. In this case, turn the power supply to off, then turn it back on again to proceed.
That should be it. Once the device is done with the initial initialization, you should see the PIN code on the screen, which will allow you to pair the screen with your Screenly account.
Recommended configurations
It is recommended that you also make the following changes to your NEC monitor.
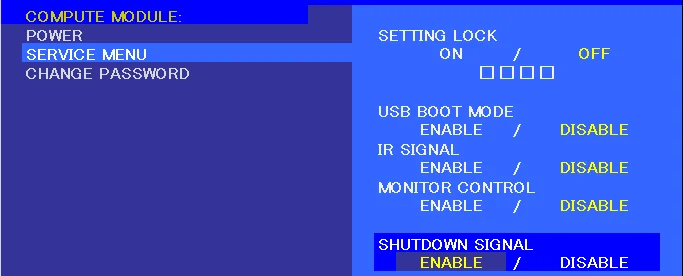
- Enable the Shutdown Signal:
- Enable Auto Power On:

Custom network configuration for Screenly
By default, Screenly is configured to use Ethernet and DHCP configured. If you instead need to use a static IP, you need to use our network configuration wizard, which is available at wizard.screenly.io. The process is very simple. You populate your settings in the wizard and then configure the Screenly Player using a USB stick. Now, this is where it gets a bit trickier with the NEC monitors.
As you may have noticed, the NEC monitor has no less than five USB ports on the side (including the Type B connector). However, only two of these are passed on to the Raspberry Pi (the two just above the LAN ports). As such, you need to insert the USB stick in one of those two ports in order for the device to pick up the network configuration. (Note: Out of the two USB ports, the port on the top can support devices that draw more power).
Can I use WiFi with my NEC monitor?
Generally speaking, we always discourage our users from using WIFi whenever possible. In some cases however, that is the only option. Since there is no built-in WiFi in the NEC monitor, the only way to do this to use a USB WiFi dongle. We recommend that if you need to use WiFi that you use the official Raspberry Pi USB WiFi Dongle. These seem to be very difficult to get a hold of, so the part that we tested and confirmed with (a Panda Wireless Adapter - Model PAU06) can be found on Amazon here.
In order to use WiFi, you need to configure the networking similarly to the section above using the network wizard. Using the tool, you can configure the SSID and passphrase and then attach this USB to the bottom port. Once the screen reboots and comes back up, you can then connect the WiFi USB dongle to the top port. For configuring the network file for use with an adapter, please see the guide here.
Troubleshooting
"Missing drivers" on Windows
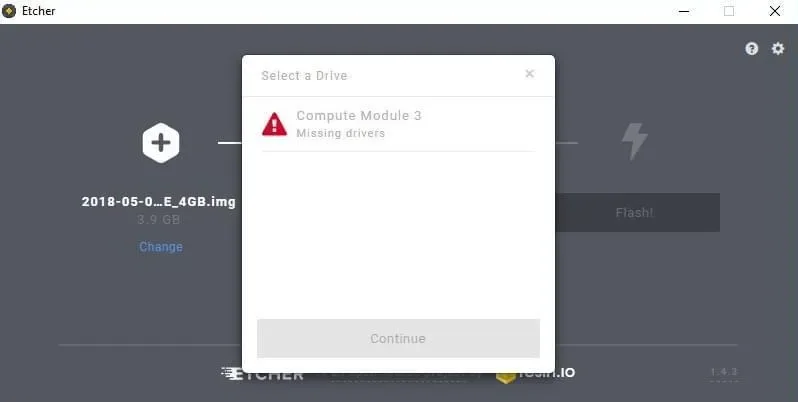
If you are trying to flash your NEC monitor from Windows and get the following message, this means that you need to install the Raspberry Pi driver.
You can do this by simply downloading the drivers from here. Once you have installed the driver, close Etcher and follow the steps in "Prepare the PC and start the flashing procedure" again.
Fig 1: USB Type-B connector