The Raspberry Pi is a low-cost and energy-efficient mini-computer that can power your digital signage. In fact, Screenly’s digital signage player, the Screenly 2 Player, is built on a Raspberry Pi device. As with all technology, things can go wrong, and the Raspberry Pi is no exception. In this article, we aim to provide a Raspberry Pi troubleshooting guide so that you can quickly address and solve any issues that may arise.
What to do when you observe a yellow bolt

If you see a flashing, yellow, lightning bolt on the screen connected to your Raspberry Pi, your device has insufficient power. More specifically, your Raspberry Pi is not receiving the required voltage. In order to fix this, make sure you have a proper micro USB power cable. Also, make sure your micro USB power supply is 5 volts and 2 amps (depending on the Raspberry Pi version). Typical micro USB cables, such as the ones for charging various electronics (like cellphones) are usually 5 volts and only 1 amp. This can lead to under-voltage for your Raspberry Pi depending on the intensity of the tasks you are trying to run.
If you are getting the yellow bolt notification, it is important to fix this issue, as persistent under-voltage can lead to a large range of strange issues ranging from random reboots to SD card corruptions and general instabilities. The best way to avoid these problems is to always use the official Raspberry Pi power supply for the given Raspberry Pi computer board.
What to do when you are stuck on a rainbow screen

The rainbow screen appears normally for a brief moment when the Raspberry Pi tests its GPU. However, sometimes the device can become stuck on the rainbow screen. Here’s a list of common reasons why this scenario can occur:
- The SD card is corrupted from wear and tear (this happens more often than you’d think).
- The flashing of the SD card went wrong (or the downloaded disk image was corrupted).
- You’re using a hardware version that is not supported by the operating system (such as a older version of Raspbian on a Raspberry Pi 3 Model B+).
The importance of SD card class rating
SD cards come in several variations. There are standard size SD cards and also micro SD cards. Be sure to check your Raspberry Pi version to see which size SD card you need (all recent Raspberry Pis use MicroSD). Another important variation is the class rating for an SD card. Essentially, the class rating describes the rate at which sustained data writing can take place. Class 4 means data can be written at a sustained 4 MB/s, class 6 means data can be written at a sustained 6 MB/s. Likewise, Class 10 means that data can be written at a sustained - you guessed it - 10 MB/s. When using a Raspberry Pi for digital signage, we found it best to use Class 10 SD cards, as performance will suffer if you use an SD card of a lower class rating. Additionally, there are sometimes issues if your SD card is too big (64GB or larger), so we recommend only using an SD card with up to 16GB of storage. This amount of storage is more than sufficient for most use cases.
It is also worth noting that all SD cards are not created equal. The brand and model will significantly impact the life span and performance. You will receive the best performance and life span with industrial grade SD cards, but the downside is that they are very expensive. We have found that Sandisk’s Ultra series have worked well for us and for our use case.
What to do if you see a rainbow square in the upper corner
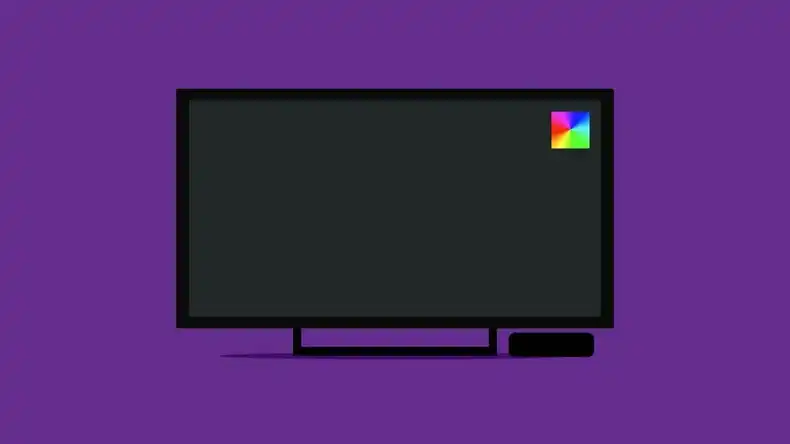
Depending on your Raspberry Pi model, this issue can be seen as a yellow or rainbow colored box on the upper right corner. This alert is another way for the Raspberry Pi to indicate low voltage issues. Ideally, your power adapter and cable are able to deliver 5 volts and 2 amps (depending on the Raspberry Pi model). If you are having this issue, make sure your power delivery meets these requirements. Some cheaper power adapters and cables deliver only 1 amp, and this may result in the observed under-voltage alert.
Why you should disable swap space
Swap space is a way for the operating system to utilize the memory space on your hard drive or SD card as an extension of your RAM. This can be useful on server workstations. For the Raspberry Pi, we strongly recommend disabling the use of swap space (this is the case for all our disk images). We make this recommendation because it will significantly shorten the lifespan of your SD card.
What to do if you receive a temperature warning
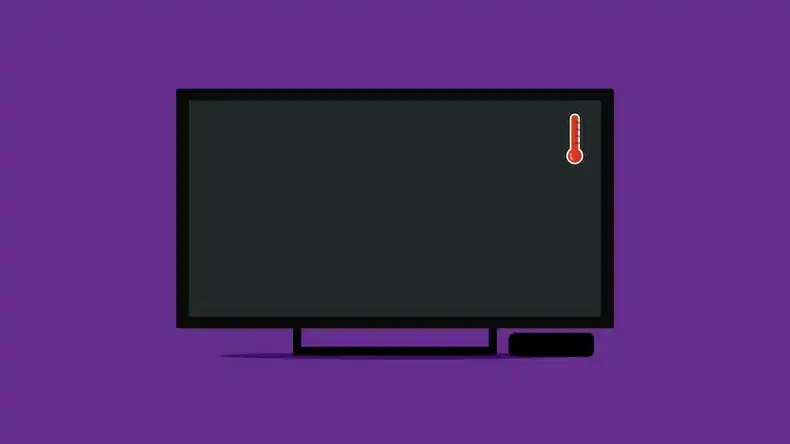
If you see a red and white thermometer alert, this means that you Raspberry Pi device is getting too hot. Of course, this is not good for the health or longevity of your hardware. Your GPU and ARM processing core(s) will slow down in order to produce less heat. If this issue persists, it is best to temporarily stop using your Raspberry Pi until you device can cool down. It should be noted that if you really need to run your Raspberry Pi in a hot environment with little air circulation, you might be able to mitigate overheating by installing a heatsink.
We hope this guide has been helpful for dealing with any Raspberry Pi related issues. It is our goal to help you resolve these issues quickly and efficiently, as the less hardware issues you experience the more time you will have to display great digital signs. Also, if you haven’t already heard, Screenly is now compatible with the Raspberry Pi 3 Model B+ for enhanced digital signage performance. If you have any additional troubleshooting questions, be sure to check out our digital signage FAQ page or submit a new support ticket if you can’t find what you need!


